

This IS my new favorite jacket in my ongoing Make a Wardrobe from Scratch project this year. ReMake is attracting more of us daily-sometimes we intuitively know what works and what doesn’t. In re-making this grey, linen jacket, I applied some of the design changes that make my garments work better on my body-type. Being able to translate those concepts and techniques to the next Remake can make it a winner too.

Here’s the transformation & my checklist of the things that make it work.
Using the same dress form, you get a feel for the original length and the shortened, finished design I am wearing. Even though I want to cover my bum, it doesn’t have to be with my outer layer. I find the shorter jackets with longer under pieces ( tee shirts, tunics etc) to be less bulky and more flattering on a lot of us.

Pinterest is a great place to explore different silhouettes on various body types. It’s a good place to start your own folders of ideas for garments ideas, and looks you’d love to wear.
Just because you can...... every remake doesn’t have to be a major project, showing every cool thing you know how to do! I LOVE to remake too… once I thought about the different ways I could transform this piece…I went with the idea of a simple 2-hr project.
Work from the top down: Neckline, shoulders, bodice, sleeves, front & back details, hems then finishing details and buttons/closures. Even though the embroidered pocket or the cool buttons draw you into a project, this sequence below is a good checklist for changes to consider as you create your new piece.

Diane's DESIGN Questions-
Overall Silhouette: Start with the big view, what do I love about this piece? What do I want more of? What do I want to accentuate/downplay? Am I going to add more fabrics? or another garment? more hardware, trims? Jot down whatever comes to mind, and check in with your list later in the process when you are on pause.
#1 Neckline/Collar: Do I want to cut the collar off? or What about it do I like?I s it to big? change the shape? pleat it? cut part of it off? remove it add binding/facing? fold the points back? Add a new collar? Once the garment came together (and I didn’t need the collar for other details, the collar was folded in half, steamed in place with machine stitching added in several places to hold it down.
#2 Shoulders upper bodice/sleeves: Is it ‘my’ size? Are the shoulders in a good place for the shape of the garment? Should I re-cut the armholes and sleeves then reset them to be more fitted? All questions you might be asking too. When using mens jackets, casual and kind of baggy works sometimes…but I often deconstruct them and recut the upper bodice, shoulders and sleeves and reconstruct that part of the garment with pattern pieces for a similar style.

#3 Sleeves: Too big? (remove some) Too small ? (need to add some). How that happens can be related to the design options you choose to repeat for the rest of the garment: ie: I added a pleat in the middle of the jacket, so pleating other parts of the jacket could be a theme used to add a pleat to the outside of a sleeve to make it narrower or shorter. Sleeve length is usually last as I look at he overall silhouette and try the jacket on. Pin them up if you think you might cut them off…but hold off to make a final decision 'til later. This did not have cuffs, but cuffs can be removed completely, or sewn back on higher up to remove some sleeve length in an inconspicuous way. Sometimes I add a new, contrasting sleeve then replace the original cuff.
#4 Linings: Is it a good one? Does the jacket need it? Will I use it ? How does it impact the way I remake ? This jacket does not have a lining…just facings (which I make a note of in case I need extras fabric).
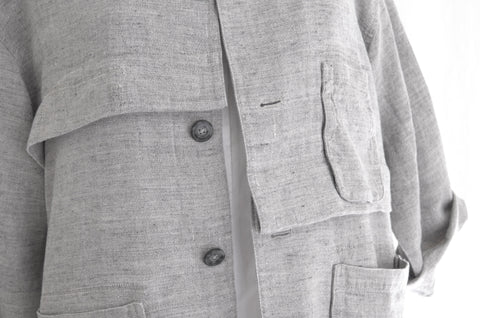
#5 BIG pockets…especially 4, WITH FLAPS and buttons are a NO-GO on my bust! If you are small chested, you might love the added fullness and emphasis of these..even swapping out for more decorative buttons and adding a contrasting topstitching can add more focus! The other issue with these pockets= the symmetry….none of that says ‘I will look great on a 40” D cup bust! I removed one of the small pockets on the top and ALL of the flaps.

Seam Ripping: As you start, notice if the garment was dyed before or after construction leaving un-dyed areas or faded spots to contend with after you remove a pocket..doesn't mean you can't do it…just another design challenge, maybe with in a very conspicuous spot. Once the pocket and flaps were removed a good steaming with an iron usually helps close the original stitching holes.

#6 Hem & side seams: Most garments feel snug around the hips for me…so opening the side seams is one of the first things I do so when I try on the garment, it relaxes and hangs better, spreading at the sides. 2 pocket flaps were added to each side of the slit…a nice way to add weight at the sides too.

#7 Hems: Symmetrical? asymmetrical? How long do I want the longest points and where …and where to shorten a garment? Sometimes shortening garment at the front takes some of the weight off and creates a more flattering line. Always remember there are options here.
My decision to create a spiraling tuck in the middle of the jacket was brilliant if I do say so myself! Way more interesting than a straight line and it brought the original hem up and kept the lower pockets in tact with no extra work there. The pleat was pinned, pressed, then stitched through all layers: from the front edge, angling down (around the body) ending at the other center front edge. Ah so good when that happens!!!

Remember, everything doesn’t need to be nailed down= A garment is meant to move on the body…so leaving pleats loose, and the side flaps open…and the collar edge open part of the way around are all ways to repeat a design theme.

#8 Details/Finishing: Stitching accents? By hand or machine? New buttons? Oh yeah, swapping out the buttons can give a fresh look to your new garment. On this jacket the original buttons were re-sewn on with white embroidery thread.
2-3 things are enough: Once there are 2-3 things working, figuring out ways to repeat them will strengthen your design eye. Editing your techniques, finishes, hand stitching/or no etc. will help create a beautiful piece and give you the confidence to start on another remake project! See you at the worktable.

My recovery update: My recent life experiences are definitely informing how I feel creating my future. I am working to shift the need to feel grounded in a place (a home) and to be more at home in myself first…no matter where I am. Stenciling the small houses inside my this collar will always remind me of that. Diane
4 comments
This is magic! A great lesson in knowing what works on your body.
Diane, you are beautiful, strong, and resilient (and have imbued this jacket with those same qualities). I look forward to your updates and design details; this was one of the best! Your positive spirit is inspiring.
Wonderful post, Diane!!! Love the jacket and love the process. It’s been a long time since I had you as a teacher!! June, here I come!
Reading about how your mind was working while you re-made this jacket was a fascinating learning experience. Love all the subtle details that brought it together. Your reminder houses on the inside collar are brilliant. You are not only a survivor, but a thriver!