

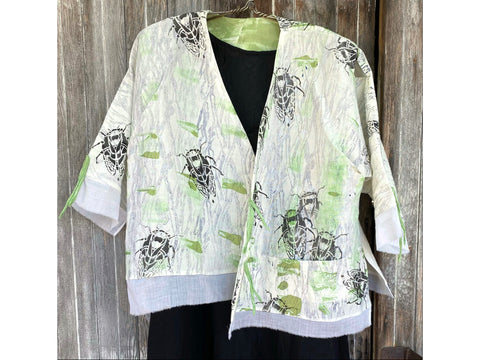
Brood 10, the Cicadas that appear in the eastern United States seem to have landed here! This shrug, started with the River Tunic Pattern and is a fun, timely piece to step out in. If you are already playing with this pattern in your wardrobe, here are the tweeks I added to create my linen Cicada stenciled topper.

Getting Started- Using a piece of linen printed with some disappointing surface design, it was the perfect piece to build on. Extra white linen pieces were added.
A commercial print with an interesting texture would make a great back ground for the Cicadas too. Next, cut out the front and back. My basic garment measurements are shown above. Mine is seamed across the shoulder foldline, allowing for the faced openings shown in the sleeves. The front was cut open up the center fronts were folded under for a long 'V' neckline opening.

A Folded Pocket (above) is a quick and easy way to add a pocket! My garment has a short one, 5" deep. Just like it sounds: the fabric is folded in a big horizontal pleat to create a pocket. A=top edge of the finished pocket B=bottom fold of the pocket and C=top placement line of the pocket on the garment. Bring line 'A' to meet 'C' to create the pocket. Press and sew part way across the fold, leaving only the opening for your hand, unstitched. The sides of this pocket can be sewn from the inside instead...and sides of the pocket closed there too. FYI: If you don't know about the Just Pockets Pattern....it is a good one!


Printing-This is the perfect time to print! Since the stenciling will call attention to the images, when the garment is cut out first, you can do some placement of images that will be most flattering. In this case, I wanted the Cicadas to 'be crawling out of the pocket, so they were printed before the pocket fold was sewn in place.

Ask yourself: How does the imagery relate to the garment and silhouette? In this case, I left several openings on the sleeves...and accentuated them by adding bugs coming out or or crawling into the openings of the garment.

Construction- This being a light-weight, summer shrug, The openings: on the sleeves, deep v-neckline and open underarms all relate.

A back neck facing (shown in hatch marks above), was cut in linen, then rubbed with the Citron green Lumiere Paint. The back neck was cut in a curve and finished with the facing once the shoulder seams were sewn. The hem edges are finished with torn cotton gauze strips that are serged to the linen, then the serging is pressed up. The lighter fabric on the hems gives a nice transition. 
Buttons?- Loops? ....GRASS?!- To my eye, buttons would be distracting on this composition. In the video below, you can see how the grass 'was made' with fabric paint from the light weight cotton gauze. It can be helpful to play with trims or closures with the garment on. I considered having a bunch of grass coming out of the pocket with the bugs, but after moving it around, settled on using the rolled grass pieces as a trim/accent on the ends of the sleeves and as ties on the front of the shrug. Pretty fun the way they fit with the theme!

Oh, more Cicada ideas have come to the surface ...maybe more later, Diane
1 comment
Great top! I love the cutouts. Very unexpected. Very inspirational. Thank you!