

March UFO Sightings-
Yes, I have many many projects in a state of ‘in process’….Spring is a great time to revisit what moves forward and what goes away. Here is my theory on these UFOs.
Not everything is meant to be a finished product. There are different reasons to make!!! Making is an adventure…often into the unknown and past our experiencial comfort zone (otherwise know as: ‘WHAT was I thinking???’)
Sometimes re-visiting those projects, reveals our growth in a different way: ie=I learned what I needed as I was making, and now I can recycle it into my stash or pass it on.

March Studio Play: Make a pin

My new spring purchased shirt just needed a few tweeks, so after adding some hand stitching, the orange fish in the printed designs reminded me of a beautifully embroidered vintage, linen piece with goldfish.
The tools needed are minimal:


Quick & Easy= Make a pin.
- Determine shape you want for finished piece. Above a paper pattern was traced for the embroidered design on the fabric.
- Cut the shape from plastic. My preference is a recycled yogurt or other food container with a curve. Notice (above) how my fish shape takes advantage of the curves in the plastic. Trace the pattern onto fabric with chalk, then cut out your fabric piece with a 1/2” ‘seam allowance all around. A stenciled design would make a great pin too.
-
Spread an even amount of craft glue onto the plastic. I’m not a fan of spray adhesives for this…they are harder to control for this kind of small project and everything can get sticky right away.

- Lay your fabric (face down) on a flat surface then press the plastic onto it. Fold the edges over onto the back, clip the curved edges and cut away some of the seam allowance where it’s too much. Once you have the edges ready, lift the fabric edges away and apply a line of glue all around the edge of the back. Fold edges back, pressing them into the glue. Clip with clothes pins to hold as needed while the glue dries. Straight pins can work well for smaller tight spots to hold.
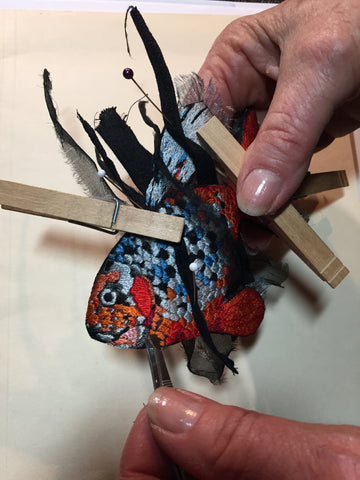
- Before finishing the back, I added linen ‘seaweed’, mesh to the tail and wire. You can sew through the plastic and add beads and charms to the pin. Using the paper pattern again, cut a backing to finish the pin. I use leather or ultra-suede for a nice finish.
- Adhere the pinback to the plastic. If the plastic is slippery, roughing it up with a bit of sandpaper will help it stick. Cut 2 slits in your backing for the ends of the pin back to come through.
- Once you like the fit of the back piece, spread a light layer of glue on the back cover, slide it over the pin back ends and press into place. Clip as needed to hold while it dries.


What a fun accessory for my spring wardrobe! For more, my article on this jewelry technique was first published in Issue #38 of Threads Magazine: (dec/jan ’92)
What’s in your UFO pile? Diane
8 comments
The pin is a beaut!
Diane, YOU are a beaut. How generous to lay out your process. How generous to remind us that not all work has to be finished to be useful to our artistic and skills development. Thank you, thank you for continuing to share your loving, thought-provoking self.
love your pin!
Fabulous pin. Brilliant idea for individualising a boring winter coat. Could be a great way to use those fabric leftovers we acquire too. Brain now ruminating on dragonfly and butterfly ideas to go with the new tran-seasonal coat that is still at the developmenal stage. Or maybe a bird…