


SUMMER Wearing=Undershirts + Mini River Tunics.
You have seen some of my layering River Tunics in the last Journal Posts. Here are some tips for making them work in your wardrobe. I’ve made friends with sleeveless! As we age, the way we feel about our arms can get in the way of light weight summer clothes. These sleeveless undershirts are a great lighter weight garment in single knits and lightweight cottons, that are fun and cool in the heat.
Here are 3 in my collection, with shaping tips & tricks to make them work.
ReMake White T-Shirt-
White Tee: A ReMake with overlapping side. This tee is easily made from a mens tee shirts ( I go for an XLG to get max length and width through the hips and hem). The neck edge is already finished so This garment just needs the sides and armholes re-made. Here is the quick sew of how it works:
Side Seam: The sides are cut open down side seams to start. BASIC RULE: Think about which side of the seam to cut on based on which edge you want to stabilize. Cut this seam open on the back side, along the seamline. This keeps the front edge more stable and lets you stretch the back (along the cut edge) if needed.
Removing SLEEVE: For this one, if the armhole edge is in a good place for you, cut the sleeve off on the sleeve side of the seam. Leaving the sewn seamline attached on the garment side of the tee. Cutting on the sleeve side of the armhole seam keeps the armhole edge from stretching…especially in a single knit that wants to roll.

Need DART SHAPING? This is a great way to shape the armhole edge and add some bust fullness instead of a dart: Stay Stitch, with a needle and thread, along the seam line. (where bust dart would happen). Next, gather fabric on the thread then press curved shape. See above how much can 'ease in' with out actually creating gathers. A pressing ham is also good for steaming the shape of this bust/armhole area.
 Cut armhole shape you want, then add binding or ribbed piece: See above: A folded piece of ribbing from the short sleeve fabric was used. With side seams open, finish armhole edge with binding or ribbed piece. Ribbed piece should be shorted than the armhole edge and pulled slightly tighter to fit while sewing. See above how the tighter edge piece is pulled and pinned before sewing. This creates a nice curve after sewing and serging to finish the inside.

Next, working on the sides: Drop fronts down as needed, overlap fronts onto back at side seams. This is one of my favorite maneuvers!!! Shown on the ironing board above, it smooths the armhole (for fuller busted shapes) and creates more fullness at hip and hem area. This overlap can be stitched from inside or as a topstitch, leaving an asymmetrical hemline and slits for more movement at the bottom. Done! The original hems were used so this one's ready to wear!
Green Knit Stripe Undershirt-

Any tee shirt pattern can be the start for this way of making an under-tee. This one started by piecing some small scraps to use at the front/neck edge. The pieces were serged together. Note: Single knits are more stretchy…the smaller the pieces are, they can use in any direction to create more interest. If it is TOOOOO stretchy, knit interfacing can be fused to your pieces first.
A Creative Strategy: One of the best changes you can make to give your creativity more range is: to elliminate the mental 'yes or no' questions that start with ‘Can I…….’? because 9 out of 10 times I bet we hear the answer as NO in our heads. Rephrasing the questions you pose to yourself, is an opening to more successful problem solving. It will make your creative process more dynamic and may surprise you with what you already know, but haven’t yet accessed.
SO a question about the direction to use a knit is transformed to: If I want to use this knit with the lengthwise grain in this direction, what do I need to consider? Making the assumption that YOU CAN is 3/4th of making progress!!!!! Honestly. It is you in there, not a pedantic, perfectionist teacher. The more you make, the better it gets and the more technique and skills you will acquire….but that only happens if you are interested and stay with it. We each have your own learning style…and trust me, as someone who did not want to learn sewing in the traditional way: YOU…in all your uniqueness is a gift! The work you create will be a celebration of that.

The Asymmetrical Neck Opening was cut then 2 bands used to finish the neckhole. At this point, I put it on the dressform ( or myself) to see where more fabric is needed for the length garment I want. This pieces being bigger will drape more …so consider how they will hang over time.

If you have worked the front and back separately, add a piece of stay tape ( a piece of selvedge was used here) to the seam to keep the shoulder seam from stretching as you sew and wear it. The pieced neckhole was laid on pattern pieces to check the shape and ‘true-up’ the armholes and any edges I want from the pattern.

Finish the Armholes-This garment has ribbing (a folded piece of the knit in the stretchy/crosswise direction of the fabric), serged on and drawing in to finish the armhole edges.
Adding length: YES, knits can be in different directions! ...especially if it is a stripe (and I want it going up and down on the body instead of around). Adding longer pieces for the front and back came next. Adding more flared shapes on the sides gives more options. I can decide when I try on the garment how much fullness I want in the lower part of the garment and hem before I sew it.

Raw edges/selvedges? This stripe piece, used the fabric across the grain. The selvedge was used for a finished hemline with slits on one edge and a clean cut raw edge was used on the other hem edge.

Black Woven Cotton Undershirt-
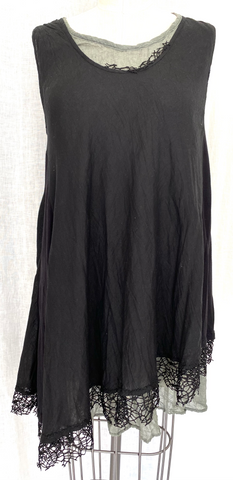
This Black Woven Cotton Undershirt is a ReMake. Purchase as a set the lightweight back, bias garment was layered over the second green layer garment. loved the look but the black piece was a questionable fit (ONE SIze FIts ALL…who are those people!?!?!?)
Even with the bias creating more stretch…not nearly enough to be a good look. I was open to a knit or a woven black fabric-it just had to be lightweight. The back bias garment was opened down the sides and a with a thin single knit cotton tee added as side pieces. A contrasting print fabric could be another choice for a fun summer top. My choice was something that would blend in and not be the focus of the overall silhouette.


Here are the shaped pieces added at the sides. The tee was sewn to the front edge and serged..then draped onto the dressform to see where the second seam needed to be in the back. I am usually very picky about fabric combos...for this one, being an underlayer and black, gave more room for choices.
I love the trimmed edge on this one. It is a cotton, novelty mesh knit. A 3-4" strip was cut then zig-zagged to the inside of the hem. The edge was shaped by trimming afterwards for the desired look.


I love the look of the small piece added to the neckline! That small bit at the neck was hand-stitched on: details are everything…..think of them as spices that can make a favorite dish…they mean alot and finish your piece.
Check out more details and ideas on the Video about these undershirts-I am already picturing winter versions of this for my new wardrobe!
Happy end of the Summer Sewing!! Diane
Try-on, pin side seams and sew them last. …pick a shrug …and go!
2 comments
I love these tee shirts! Great tips! I’m ready to cut out some vests by two of your patterns. These tees are a great idea for underneath. Where I live, it stays warm until Oct! Sometimes Nov! So, sleeveless is possible or I can do shirt sleeves with some reconstruction of man’s undershirt!
I just received my order. Your new packing for the paper pattern with instructions in the plastic zip lock is outstanding!!!!!